 Residential
 Auto
Auto Commercial
 Emergency
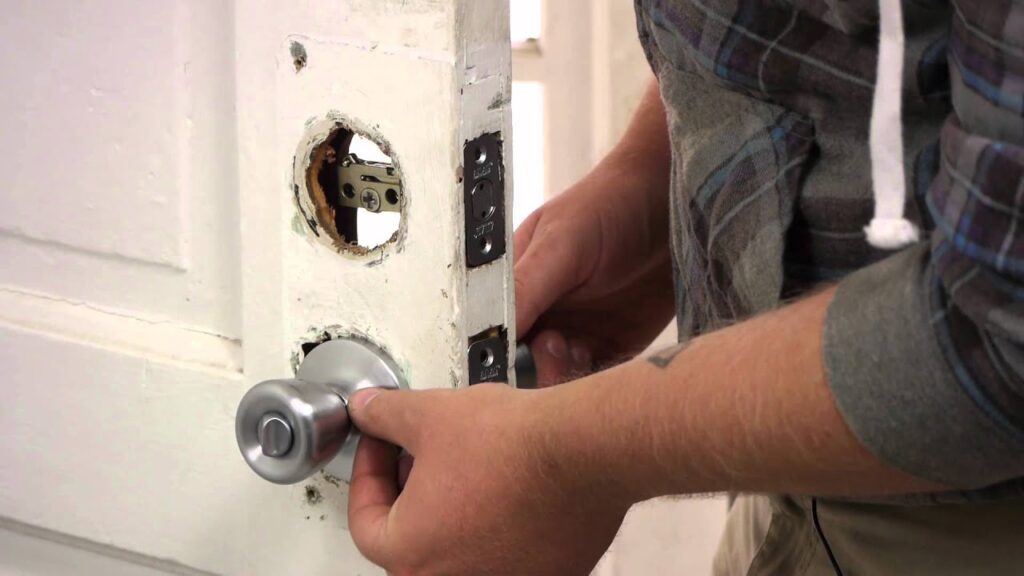
How to install the lock by yourself
Changing the door handle and door lock on your front entryway is a financially savvy method of expanding the control allure of your home and improving its security, all around. This guide will tell you the best way to install a door lock in a few minutes.
1. Reference the Manufacturer’s Template
Most deadbolt-lock makers give a layout to assist you with introducing the lock. The layout is intended to work with entryways of various thicknesses and has reference focuses that might be set apart on the entryway with a borer. The deadbolt ought to be in any event 6″ over your door handle.
2. Cut a Hole for the Deadbolt
After you mark the reference focuses on the format, utilize an opening saw to start cutting the hole for the deadbolt. At the point when the pilot bit on the hole saw gets through the opposite side of the entryway, quit cutting. Finish the hole from the opposite side of the way to forestall splinters. On the off chance that your hole saw isn’t sufficiently profound to infiltrate the outside essence of the entryway, utilize a standard piece to wrap up drilling the hole you’ll use as a source of the perspective point.
3. Drill a Hole through the Edge of the Door
Utilize a 7/8″ spade spot to bore a hole through the edge of the entryway for the jolt.
4. Mortise the Area around the Faceplate
Dry-fit the jolt into the opening, and follow around the faceplate. Utilize a wood etch to mortise the region around the faceplate so it will be flush with the entryway. When utilizing the etch, keep the angled side in toward the mortised territory, and tap the apparatus adequately profound to break the faceplate. You may require a smaller etch to mortise the adjusted corners.
5. Secure the Bolt to the Door
Keep mortising until the faceplate fits appropriately. Drill pilot holes, and secure the fastener to the entryway with screws.
6. Introduce the Cylinder and Thumb Lever
Dry-fit the chamber and thumb-turn plate so you’ll realize how the pieces fit together. Fit the outside side onto the entryway first, ensuring the composing is upstanding. At that point set the inside piece set up, and adjust the screw openings with the mounting openings inside the lock. Secure the deadbolt set up with screws.
7. Drill Holes again and secure the Plate in its position
Imprint the finish of the jolt with paint or you can use lipstick. Close the entryway, and turn the deadbolt a few times to stamp the door jamb. Utilize a 7/8″ spade spot to penetrate two covering openings in the door jamb for the deadbolt. Mortise the territory around the opening so the strike plate will fit flush with the door jamb. Drill pilot openings and secure the striker plate with screws.
Conclusion
After following these steps, you’ll have to effectively install your brand new entryway lock. Feel great realizing you’ve supported the check bid as well as added additional security to your home!


 Call Us - 215 534 4113